
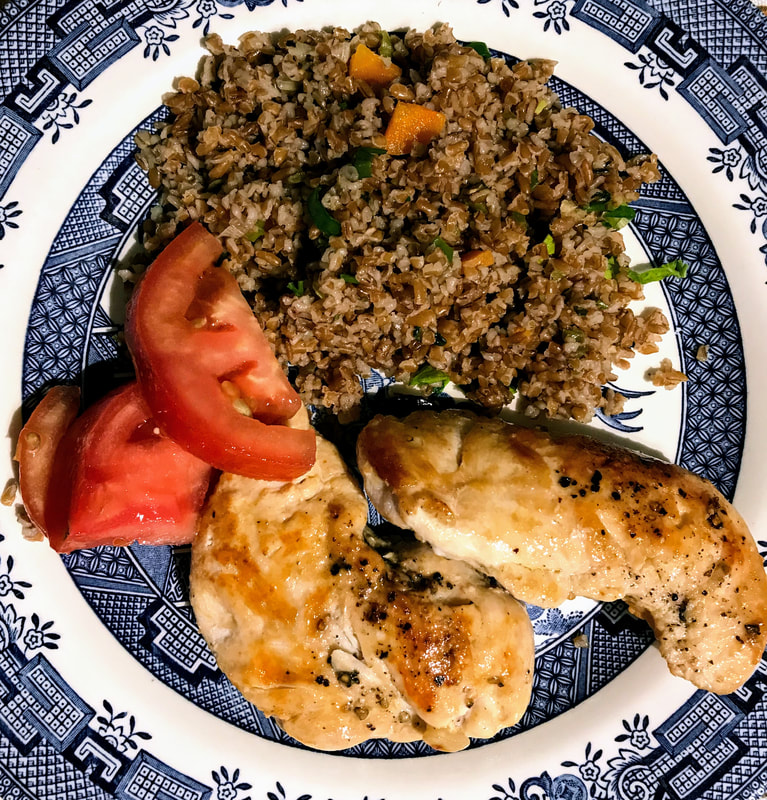
Lemon Chicken with Pitimi
11/8/2021
 Ingredients:
Marinade:
Directions: Cook the sorghum grain using 2 cups of the water in a pressure cooker at High Pressure for 1 hour. While the sorghum is cooking, prepare the other ingredients. To prepare the marinade, combine all the ingredients except for the sliced chicken breasts in a zip lock and then marinate chicken for at least 30 minutes. Using a medium-sized pot, start sautéing on medium heat for about 10 minutes the onions, garlic, green pepper, and serrano pepper in 2 tbsps. olive oil. Add the lemon pepper and salt. Then add cooked sorghum into the pot and cook for an additional 10 minutes on low heat. Brush a grill pan lightly with the remaining ½ tbsp. olive oil and cook marinated chicken for about 4 minutes on each side; brush occasionally chicken with marinade. Once cooked, cut chicken into small strips and place over the sorghum pilaf. Garnish with cilantro and serve. Source: NuLife
0 Comments
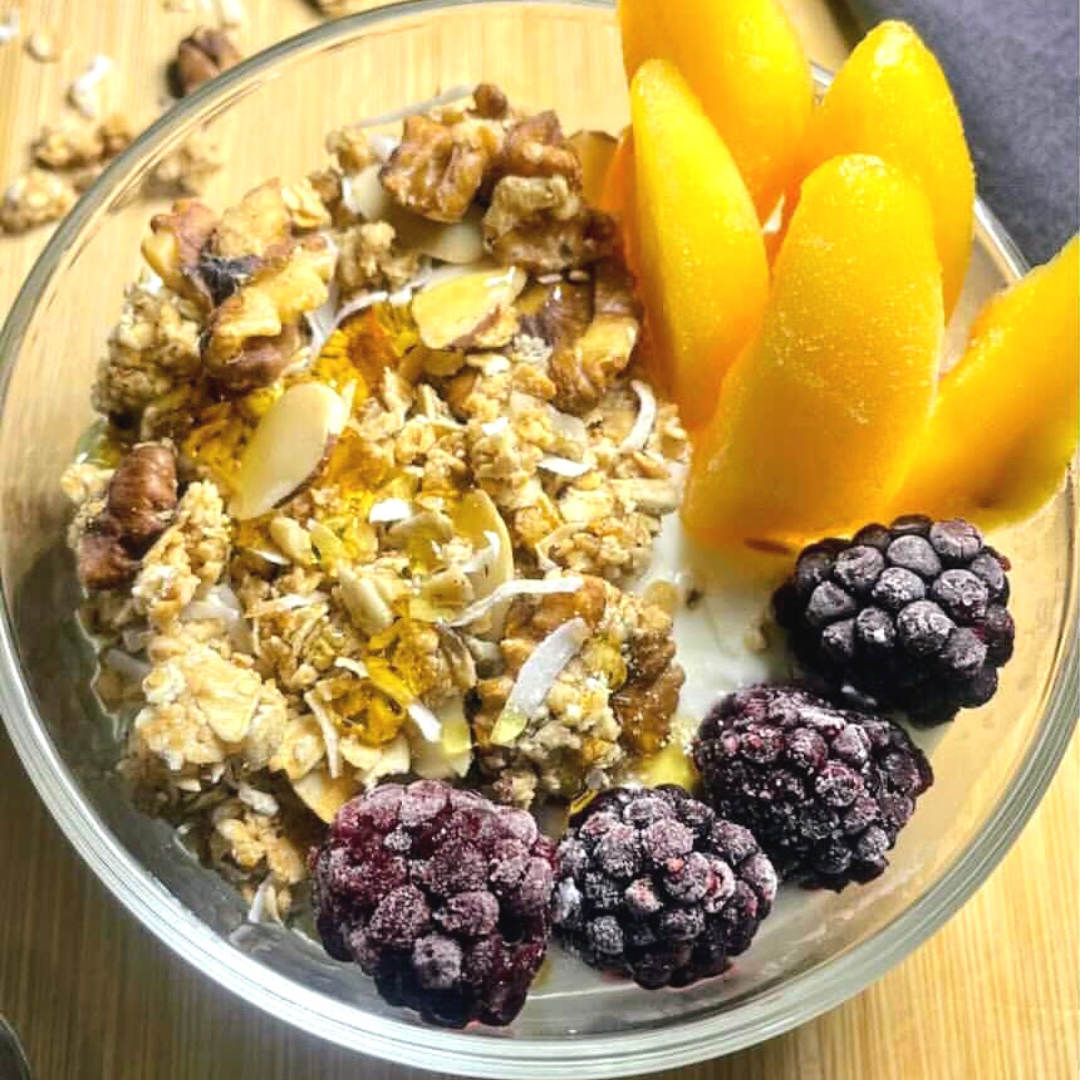
Yummmy Coconut Granola
3/16/2021
 Ingredients:
Prep: preheat oven to 350 degrees F, prepare baking sheet lined with parchment paper
Recipe and photo credits: Nikki Nedd What is Pitimi?
2/18/2021
 What is pitimi? Pitimi is the haitian creole translation for millet. It's not just for the birds. It's packed with health benefits, is gluten-free, high in protein, fiber and antioxidants! Health benefits 1 cooked cup of pitimi contains 25% of the daily value (DV) of phosphorous, 19% of the DV for magnesium, 8% of DV for phosphate and 6% of DV for iron, but what's most surprising is that it contains the highest calcium content of all cereal grains, providing 13% of DV per cup. As we all know calcium is crucial to maintain our bones healthy, but it also helps ensure proper nerve function, blood vessel and muscular contraction health. Rich in antioxidants Millet contains antioxidants that are linked to rapid wound healing, skin protection and anti-inflammatory properties Promote heart health Millet has a low glycemic index (GI) making it suitable for those with diabetes and a great replacement for rice since it's unlikely that it will spike your sugar levels. Additionally, it contains soluble fibers that may help reduce your cholesterol levels. Now, all things must be consumed with moderation and pitimi is no exception to that rule. Excessive consumption of pitimi may lead to a reduced absorption of nutrients your body needs and may impair thyroid function. You can reduce these adverse effects by including pitimi as part of your balanced diet and also by soaking it overnight in room temperature water, draining and rinsing before cooking. Shop Yummmy Pitimi and let us know what you think! Source: Healthline Honey Series: Benefits of Honey
1/28/2021
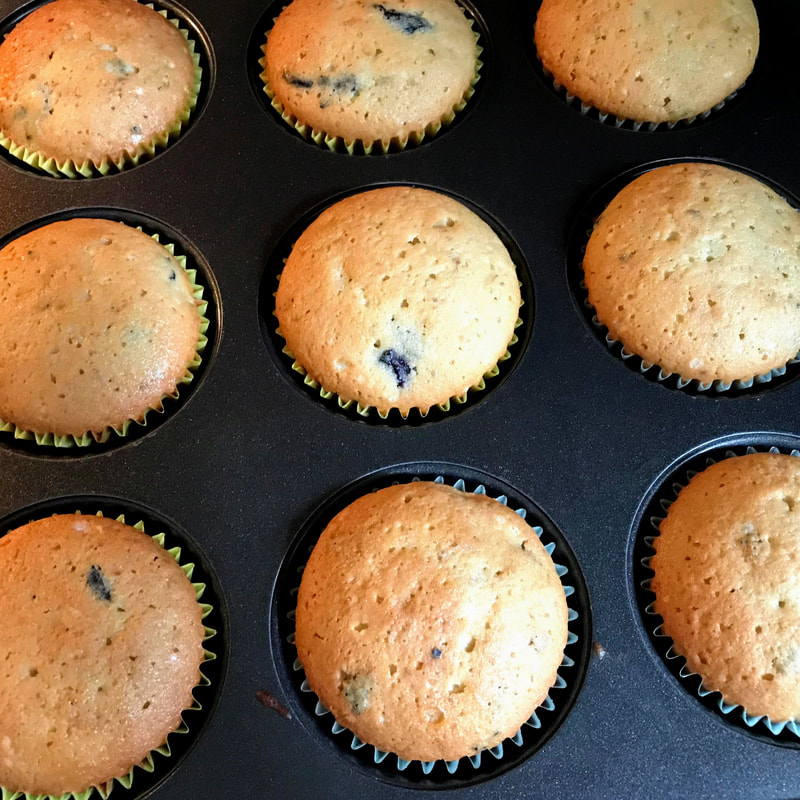
 Many of us know all about honey as a natural remedy for a sore throat, but did you know that honey can help with your allergies, increase energy and memory, boost your immune system and even help with dandruff? The average composition of honey is approximately 80% carbohydrates, 18% water, and 2% vitamins. The vitamins included are calcium, copper, iron, magnesium, manganese, phosphorus, potassium, sodium and zinc Each tablespoon contains 64 fat-free, sodium-free, and cholesterol-free calories. Now that’s a guilt-free pleasure! Raw honey offer many benefits due to its rich nutritional content. It contains minerals, vitamins, amino acids and flavonoids and phenolic acid which act as antioxidants. The nutrition varies depending on the floral variety of the honey but are pretty similar. Some of the benefits include: Energy booster Instead of drinking an energy drink that’s full of refined-sugars and high fructose syrup, take advantage of honey’s natural source of carbohydrates to fuel your body, which has demonstrated to provide the same kind of energy boost as energy drinks. Honey maintains muscle glycogen (stored carbohydrates), giving athletes the boost they need when they need it most. Sleep Aid Ditch the fatigue and crankiness due to a lack of rest with honey. Taking a spoonful of honey before bed can help you get a good night’s rest. The reason for this is that the sugar in honey raises your insulin level allowing tryptophan, an amino acid that makes us sleepy, enter your brain more easily. Reduces allergies Honey contains small amounts of pollen from the bees. This pollen allows you to trace the origin of the honey and discover its floral variety. But by consuming the pollen, it enables you to get your body accustomed to pollen that aggravates your allergies. It works like a vaccine; the pollen enters your body and your immune system attacks and kills it, and build up immunity at the same time. To take advantage of this, it’s important to consume local honey since it will contain the pollen found in your community that causes your allergy and it is recommended to consume local raw honey (unfiltered and unheated honey to ensure the pollen hasn’t been filtered out) 2 months before allergy season. Beauty aid Due to honey’s anti fungal and antibacterial properties, it is a great remedy for scalp issues like dandruff and skin lesions. If you have a minor abrasion, simply dab a little honey and the thickness of the honey will protect against bacteria and dirt affecting the cut. For your hair, just dilute honey with water or mix with olive oil, apply and leave for a few hours. It will not only help with your scalp issue but also moisturize your hair. Honey is also used to moisturize your skin and can be used as a moisturizing exfoliator by simply adding sea salt or rolled oats to the honey and apply to your body. Sore throat soother and cough suppressant The World Health Organization (WHO) identifies honey as a potential demulcent (relieving inflammation or irritation) for cough so during the harsh winter months, stock up on honey to help reduce cough and alleviate sore throats. Please note, do not give honey to children less than a year old. Their digestive system isn’t mature enough to ingest honey. As with any food, we recommend to use honey with moderation due to its high level of fructose. Remember moderation is key to living a healthy and natural life! You can find Yummmy’s Florida Raw Honey, which is unfiltered and unheated, in a variety of sizes directly on Amazon and in local South Florida stores including Sedano’s, Winn-Dixie and Fresco y Mas. Please contact your local store for availability. Yummmy Blueberry Muffins with Dry Milk
7/30/2020
 Serving size: 12-15 muffins
Ingredients:
Equipment: Muffin pan Electric mixer Small bowl Big bowl Spatula Measuring cups & spoons Muffin liners (optional) Instructions:
Recipe from: La Romi Bakery Use la leche en polvo Yummmy para todas sus recetas que requieren leche. Abajo tiene la tabla de conversión para llegar a la cantidad exacta. Bate para que el polvo se mezcle bien con el agua. 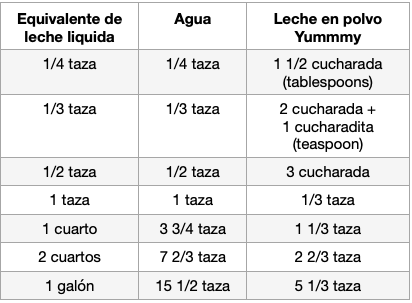 Use Yummmy Instant Dry Milk powder for all your baking needs. Below is a chart showing you the correct ratios of water and powder milk to create liquid milk. Mix well to avoid lumpy milk. 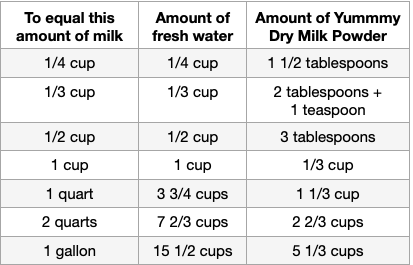 Yummmy Quinoa Salad
7/16/2020
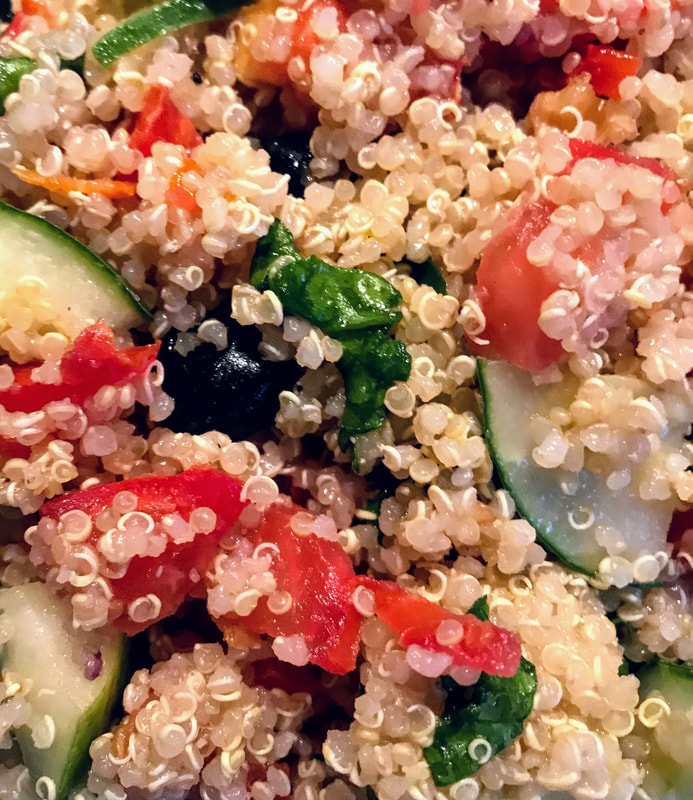 Serving: 4 people
INGREDIENTS
INSTRUCTIONS
Source: Cookie and Kate Arroz Basmati a la Mechi (Español)
7/7/2020
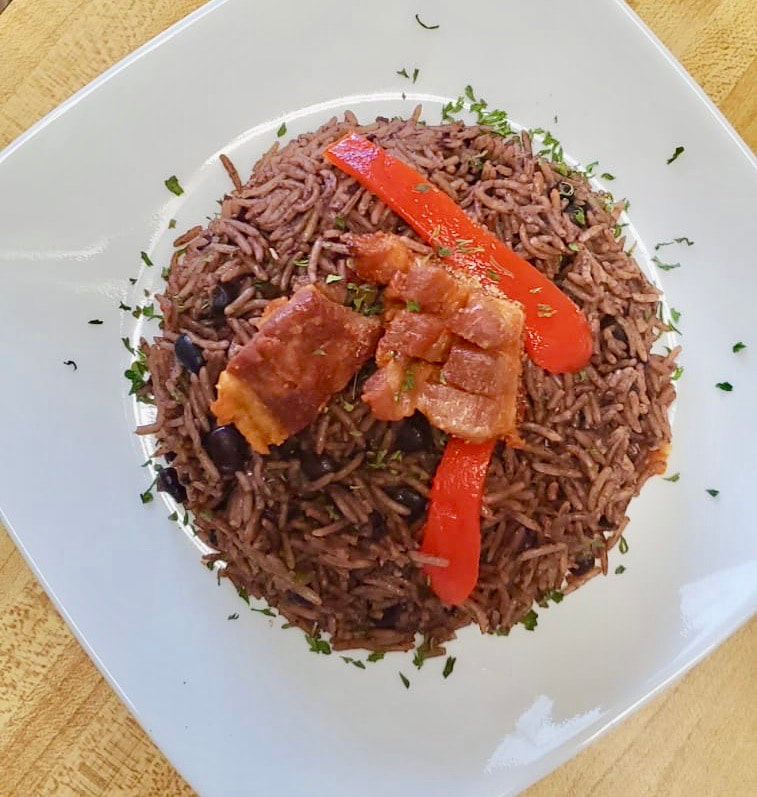 Ingredientes:
4 tazas de arroz basmati Yummmy 4 tazas de agua de frijoles negros. 1 cucharada de sal 1/2 cucharada de sazón completa Comino Ajo molido 1/2 Cebolla 1/2 Ají Un pedaso de tocino Instrucciones: Se sofrien los sazones con el tocino y se le echa al arroz. Se cocina por 15 minutos en la cazuela de arroz. Despues se revisa si esta durito, se pone unos 10 minutos mas. Y a disfrutralo. Enviado por Mercedes "Mechi" Perez Pitimi Millet Recipe
5/6/2020
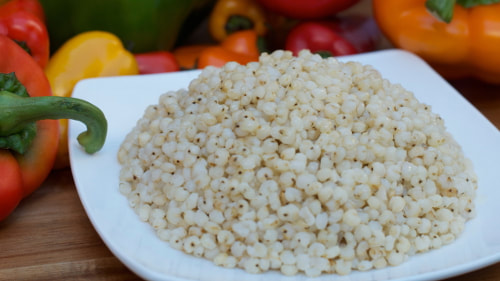 We found this simple recipe to prepare Pitimi to pair it with your favorite meat or chicken.
What you will need from the kitchen to make this Pitimi:
Cornmeal Porridge
5/6/2020
 What you will need in the kitchen for this recipe:
Ingredients from your pantry:
Ingredients from your refrigerator:
Let's make this:
Enjoy! Everyday Corn Bread
4/30/2020
 Try this basic cornbread recipe and go a little beyond with some honey for good measure. Things you will need for this recipe, besides the oven:
Here are the ingredients: From the pantry:
Let's make some cornbread! Start by combining all the dry ingredients into you large mixing bowl. Once the dry ingredients are fully combined, add the egg, the milk and the butter. Beat for 30 seconds to one minute - be sure to not mix the batter too much. Pour the mix into the greased pan Once the mix is evenly spread on your pan, place it in your already heated oven and bake for 18 to 25 minutes, depending on your oven. And then some: To vary your cornbread, consider mixing some honey with some butter in a skillet and melting them until a consistency that allows you to pour it evenly over your fully baked cornbread. Carefully spread the honey/butter mix across the top of your cornbread. Enjoy! Photo by Buenosia Carol
Corn Meal Pancakes
4/30/2020
 Get ready for pancakes, delicious at any time, perfect to start the day. Here are some basic items you will need to make your pancakes:
In on of your two large mixing bowls, combine the flour, the cornmeal, the sugar, the baking powder and the salt. In the other mixing bowl whisk the eggs, milk and the oil. Once combined, move the ingredients to the dry ingredients bowl and stir just until moistened. Pour batter 1/4 cup at a time onto a lightly greased hot griddle or skillet. Turn the pancake when bubbles form on top and continue cooking until the second side is golden brown. Serve with syrup to your liking and add a dab of butter for even more flavor. This recipe yields approximately: 4 servings. Enjoy! Photo by Matheus Gomes
Super Moist Brownies
4/29/2020
 Have the following ready for this recipe:
Photo by skeeze--272447
 Here is what you will need to make these cookies:
Products from the fridge
Enjoy your cookies and let us know how they taste! Recipe: Bulgur Pilaf
4/24/2019
 Serving: 4, Prep and cook time: 30 - 40 minutes
Tip: Bulgur is cooked like rice in this recipe Ingredients:
Prep: 1) Chop scallions, leave the top green part of 2 of the scallions aside to chop and add as a garnish 2) Chop carrot 3) Boil 2 cups of water, and add 1 cup of boiled water to bulgur wheat, let it sit for 8-10 minutes until it gets fluffy Directions: 1) Heat saucepan in high heat and add olive oil to cover base of the pan 2) Once hot, add chopped scallions to pan and lower heat to medium 3) When scallion are soft, add bulgur wheat (with water you had it sit in), and add a bit of butter 4) Wait 1 min 5) Add 1 cup of water, chopped carrot, cumin, salt and pepper, increase heat to bring to boil and cover with lid 6) Once boiling, reduce heat and stir bulgur around so as to not let it stick to pan and wait 10-15 mins. 7) Once you start to see water disappear, taste it and if hard, add a little bit of water. If not necessary, remove from heat, stir and let it sit so that remaining water evaporates 8) Once fully cooked add to bowl and garnish with chopped parsley leaves, remaining scallion, add walnuts and raisins or chopped tomatoes to your hearts content and enjoy! Great pairing for grilled chicken All about Bulgur Wheat
4/2/2019
 Bulgur wheat has a long history! In approximately 2,800 B.C., the Chinese emperor Shen Nung declared it one of five sacred crops along with rice, millet, barley and soybeans.
The process for making bulgur wheat originated in the Mediterranean region and has been popular in many Middle Eastern dishes for thousand of years. Bulgur used to be made by boiling whole wheat kernels in water, followed by sun drying, and then stone ground to crack the kernels. Now this is done with machinery. Bulgur is an edible cereal grain made from dried, cracked wheat and is parboiled. Parboiling extends the shelf life by making it resistant to mold contamination and insects, and makes it easier and quicker to cook. It also makes it high in resistant starch reducing the glycemic index, which is 46, much better than white rice – 76, and even brown rice -66. This ingredient not only is easy to prepare and delicious, but is full of nutritional and health benefits. According to NutritionData, 1-cup (182-gram) serving of cooked bulgur offers:
Because bulgur is a fiber-rich whole grain, it may have a positive impact on heart health, weight loss, blood sugar control and digestive health. Bulgur is easy to cook and has a similar consistency to quinoa or couscous. The cooking process is similar too in that boiling water is used to soften the grain. We encourage you to try out some new recipes to incorporate into your salads or pilafs, or even eat for breakfast. Share with us your creations by tagging us on social media @yummmynaturalfoods or e-mail us! You can find our bulgur in your local supermarket in South Florida or in Amazon. If you want your local supermarket to carry our bulgur wheat, let them know by commenting below or directly communicating with your store. Disclaimer: If you have any health problems, please consult your physician/ nutritionist, before proceeding. Source: https://www.healthline.com/nutrition/bulgur-wheat#how-to-cook Recipe: Basmati with Wild Rice
2/12/2019
Serving: 4 adults
Ingredients:
Directions:
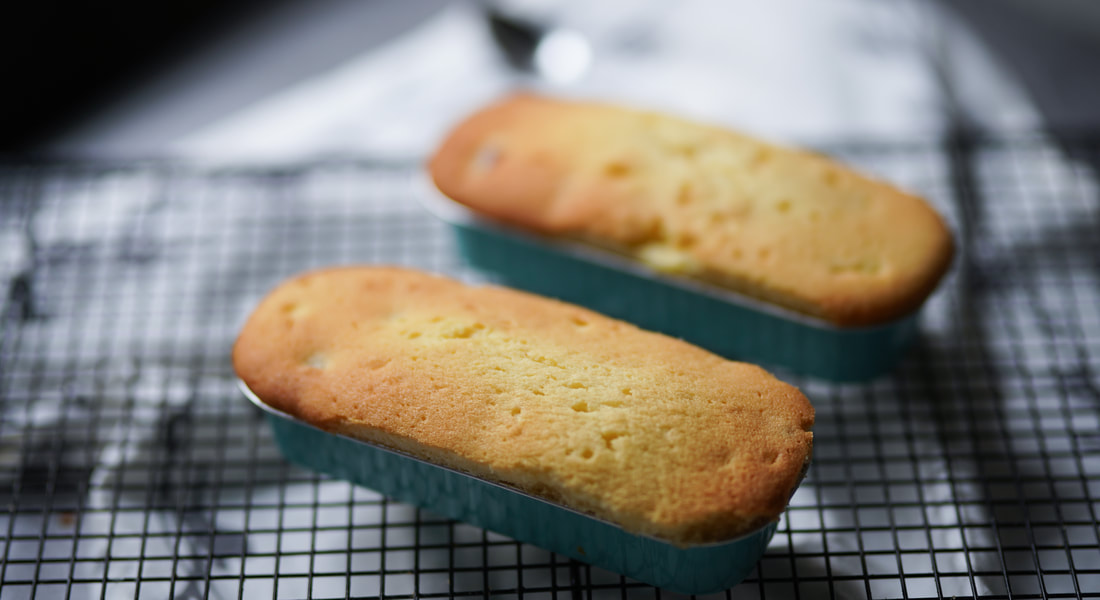
Now you should have fluffy, delicious, and healthy rice to accompany the main course. Enjoy! Recipe: Apple Cinnamon Cake
2/8/2019
For those trying to please that sweet tooth but are maintaining the will power to continue with your New Year diet, here's an easy and yummy dessert recipe! 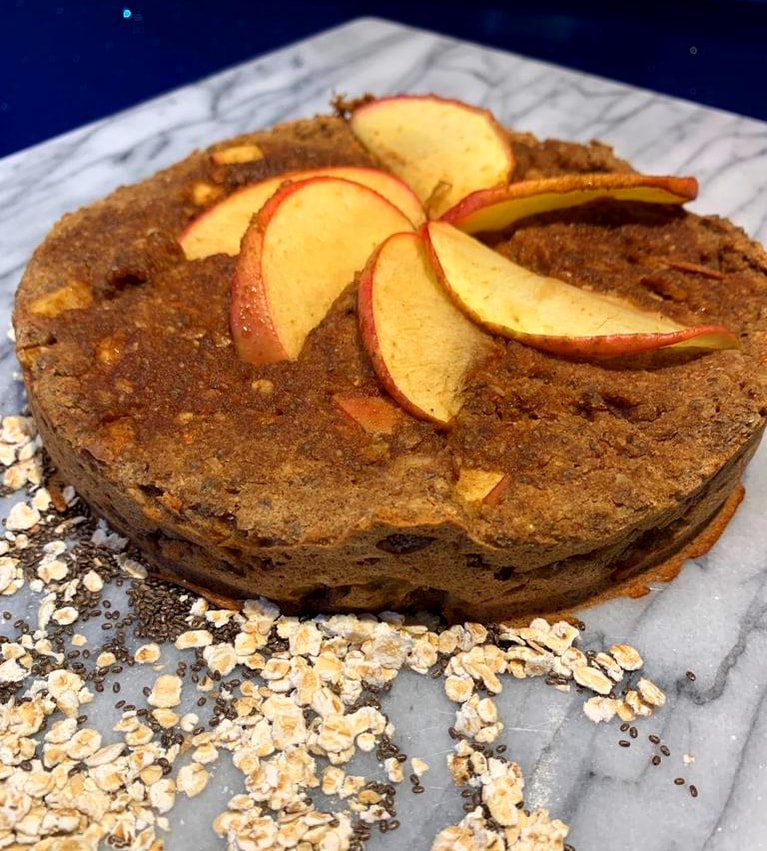 Serving: 4
Ingredients:
Directions: 1. Blend all ingredients together 2. Place mix in baking pan 3. Bake for 30 - 40 minutes 4. Garnish with peeled apple and cinnamon powder Credit: Special thanks to my sister, Maria, for sharing this recipe! Honey Oatmeal Chocolate Chip Cookies
8/25/2017
 Yield: 5 dozen (it may sound a lot, but in my family of 4 the cookies were gone in 3 days)
Ingredients:
Directions:
Recipe provided courtesy of the National Honey Board. |